


The holiday season is officially upon us, which, for many, is synonymous with the baking season! The one book you need to guide you through the holidays - and virtually every occasion - is Creative Cookie Decorating by Emily Hutchinson, creator of The Hutch Oven. With 500 step-by-step instructions, you can’t go wrong.
She begins her book with useful tips and recommendations, such as checking the expiration dates on ingredients like flour and baking powder (I had no idea that baking powder expired!). So if your goal is to become a better baker, don’t skip this section!
After covering the essential baking tools, Emily jumps into techniques, each one including a Master Tip: how to correctly fill your piping bag, how to smooth buttercream onto cookies, how to make two-toned and marbled buttercream, and how to pipe different shapes. She includes a Classic Sugar Cookie recipe and a Brown Sugar Cookie recipe as well as Chocolate Chip Cut-Out Cookies, Red Velvet Sugar Cookies, and Chocolate Sugar Cookies. For those with dietary restrictions, she also has a Dairy-Free Sugar Cookie recipe, a Gluten-Free Sugar Cookie recipe, as well as a Gluten-Free and Dairy-Free Sugar Cookie recipe. I have Celiac disease and have many friends with gluten-intolerances, so I’ve chosen to include Emily’s delicious Gluten-Free Sugar Cookie recipe below.
Her luscious buttercream recipes (including a Dairy-Free version) will leave you drooling. She’ll walk you through the buttercream basics, and her Master Tip even covers how weather affects the consistency of your buttercream.
Creative Cookie Decorating’s chapters include fun designs for holidays and events during each of the four seasons. I’m featuring her darling Thanksgiving Turkey cookies below with Emily's easy 8-step decorating instructions. I'll be featuring her adorable Hat & Mitten cookie designs after Thanksgiving, so stay tuned!
“These cookies will get gobbled up on the Thanksgiving table. Family time is so important, so I wanted to include cookies that your kids can get involved in making. The marbled leaves are fun for the whole family because they can gently knead the dough with gloves on and see the colors mixing (instructions not included in this post). The turkey cookie is simple enough, and you can get more detailed on the face if you would like, but I think he is charming the way he is. I do have a serious question: Why can't you take a turkey to church? Because they have fowl language!” ~ Emily Hutchinson
From the Kitchen:
3-inch round cookies (see Gluten-Free Sugar Cookie Recipe below)
Batch of buttercream (see recipe below)
From the Drawer:
Tips 104, 12, and 2
Red, yellow, orange, brown and black food coloring
Turkey Instructions
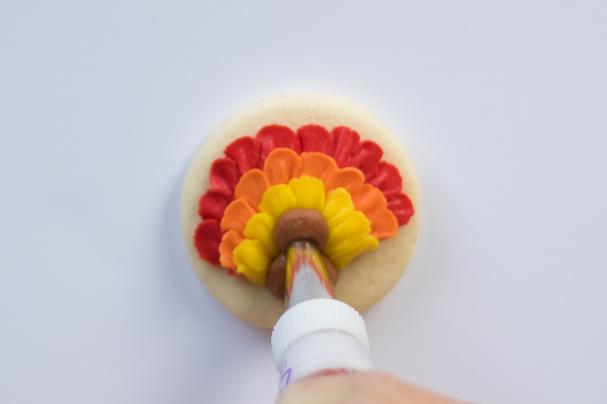
Start with your red buttercream. Use tip 104 with the skinny side of the tip facing the edge of the cookie. Gently squeeze while creating a ruffle that goes halfway around your cookie.
With orange buttercream, use the same method to make second layer.
For your last layer, use yellow and slightly overlap orange but leave room for the body.
Make a larger mound for the body with brown buttercream and tip 12. Stop squeezing and pull up for a clean break in the buttercream. Make the turkey head just above the body with brown and tip 12. Squeeze buttercream until desired shape overlaps yellow feathers.
Attach tip 2 to the orange and make little feet.
Also make your turkey beak with the same tip and color as the feet.
With black buttercream and tip 2, add tiny little eyes.
Completed turkey.


Gluten-Free Sugar Cookie Recipe
Makes 24 large cookies
“Some of my closest friends cannot have gluten. I really wanted to include everyone in this book. I know it’s especially hard when your children cannot have gluten, so this recipe allows the whole family to be included – everyone can eat the cookies. This is a gluten-free recipe that doesn’t spread and stays soft. I have found that the 1 to 1 flour is easy and so handy. I’m excited to share a delicious recipe that is simple, special and so yummy! Put on your apron and let’s get to it!” ~ Emily Hutchinson
Ingredients
1 cup or 2 sticks salted sweet cream butter
¾ cup white granulated sugar
½ cup white confectioners’ sugar
1 ½ teaspoons pure vanilla gluten-free extract
1 large egg
2 ¾ cups 1-to-1 gluten-free flour, plus extra for rolling
1 ½ teaspoon aluminum-free baking powder
Instructions
Cream butter, both sugars, vanilla, and egg together for about 1 minute on medium speed.
Mix dry ingredients (flour and baking powder) in a separate bowl. I use a whisk to blend the dry ingredients together. You can also sift the dry ingredients together.
Add dry ingredients to your wet ingredients. Mix until the cookie mix becomes a dough and it pulls away from the sides of the bowl. It will seem a little dry, but it will all come together.
Remove dough from bowl, wrap in plastic, and place in the fridge for at least 15 minutes. This will allow your dough to firm up a bit for rolling and getting sharp edges.
Preheat oven to 375 degrees F.
Flour your surface and roll out dought to ¼-inch thick. Cut your cookies into desired shapes.
Place on a baking sheet, and bake for 6 to 7 minutes or until the cookies puff up. Cookie will dry out quickly if you overbake with the gluten-free flour.
Let cool on a cookie sheet for around 5 minutes or the cookie can crumble. Transfer to a cooling rack.
MASTER TIP:
Keep your cookies sot by freezing them for an hour or overnight. When you retrieve your cookies from the freezer, make sure they are thawed before you frost.
Crusting American Buttercream
Makes about 4 cups
“This recipe works best for me or decorating. It’s a little sweet but the powdered sugar makes a strong crust. You can use all butter and it will still form a crust; however, the shortening gives it a smoother texture. Typically for a buttercream recipe you would mix until light and fluffy, but not this recipe. You want the buttercream to be nice and smooth, so we will just mix for a minute or two. This was adapted from Wilton’s buttercream recipe. You can add either heavy cream or milk; I like the thickness that heavy cream provides to the buttercream. Milk will just make for a thinner buttercream which may help in colder climates.” ~ Emily Hutchinson
Ingredients
1 cup salted sweet cream butter, room temperature
1 cup Crisco shortening, room temperature
2 teaspoons vanilla extract
9 cups confectioners’ sugar
3 tablespoons heavy cream or milk
Instructions
Cream your butter and shortening until well incorporated. Both must be at room temperature to prevent clumping.
Once creamed, add your vanilla. Mix again for 1 minute.
Sift your powdered sugar to make sure there are no clumps and add it in.
Place a towel over your mixer to prevent a powdered sugar storm.
Once mixed, slowly add in your heavy cream or milk, 1 tablespoon at a time (you can always add more but you can’t take it out). Continue to add more than the recipe states if it’s too thick.
Mix until smooth, about 1 minute on medium to high speed. Be sure not to overwhip your buttercream. DON’T panic – you won’t ruin it if it whips longer. Store unused buttercream in an airtight container in the fridge for up to a week or freeze for up to three months.


