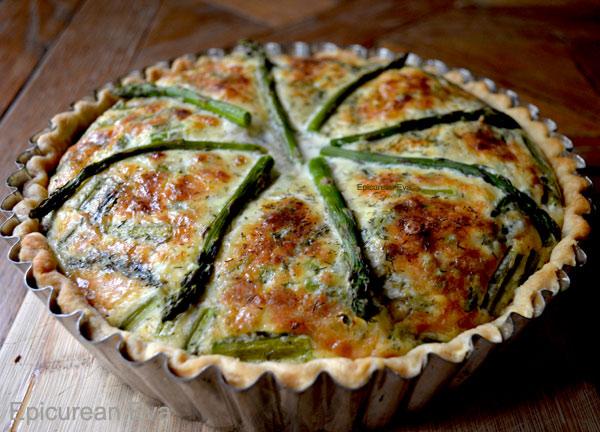
The Way the French Do It ~ Asparagus & Mushroom Quiche
Total Steps
15
Ingredients
25
Tools Needed
1
Related Article
Epicuren EvaIngredients
- 2 cups all purpose flour
- 1/2 teaspoons salt
- 1 3/4 sticks chilled unsalted butter
- 1/2 cups cold water
- 1 1/2 tablespoons unsalted butter
- 1 1/2 tablespoons olive oil(optional)
- 1 clove fresh garlic, minced
- 1 1/2 cups mushrooms
- 1/2 bell pepper red bell pepper
- 15-18 spears asparagus
- 6-8 stalks asparagus
- 1 3/4 cups cream
- 1 3/4 cups milk(optional)
- 1 3/4 cups half & half(optional)
- 6 eggs large extra large eggs
- 1 cups coarsely grated Gruyere Cheese
- 1 cups coarsely grated Emmentaler cheese
- 1 cups Jarlsburg cheese(optional)
- 1/4 cups finely grated Parmesan cheese
- 1/2 teaspoons dried dill
- 1 tablespoons fresh dill(optional)
- pinch nutmeg
- pinch cayenne pepper(optional)
- to taste salt
- to taste pepper
Instructions
Step 1
For the crust:
Step 2
Blend flour, salt, and butter in a food processor by pulsing on and off until a coarse meal forms. Add the water a bit a little at a time and give the dough a few pulses until the dough just begins to come together.
Step 3
Remove the dough from the food processor, forming into ball and then flattening into a round disk. Wrap in wax paper or plastic wrap and chill for 1 hour.
Step 4
Roll out dough on lightly floured surface to a 14-inch round. Transfer dough to pan, pressing onto bottom and up sides of pan; trim any excess dough. Pierce the bottom of the crust with a fork in a number of places to allow the steam to vent. Chill for 10 minutes in the freezer.
Step 5
Preheat oven to 450°F.
Step 6
Remove the crust from the freezer. Take a large piece of parchment paper and gently press it onto the crust, fill with pie weights or dried beans and bake for 15 minutes. Remove paper and weights and continue to bake until it begins to get a golden color, about 7- 10 minutes. Allow to cool until warm.
Step 7
For the filling:
Step 8
Melt butter in a skillet over medium heat. Add shallots, garlic and red pepper and sauté until soft, about 2 minutes. Toss with cooked mushrooms; sprinkle with salt and pepper and set aside.
Step 9
Preheat oven to 375°F.
Step 10
Place cooled crust still in pan on a baking sheet. Drain mushroom mixture if needed and then scatter over bottom of crust. Cover the mushroom mixture with half of the cheese, arrange uncooked asparagus on top of cheese and then scatter the remaining cheese over the asparagus. Whisk cream, eggs, dill, nutmeg, and cayenne pepper in medium bowl. Season well with salt and pepper to taste.
Step 11
A word about the egg custard mixture:
Step 12
I use Julia Child’s basic quiche custard master recipe, which is 3 extra large eggs and then enough cream to make 1 1/2 cups. The measurements that I have used above are what I use for the deep fluted tin that I make my quiches in. You can adjust the amounts according to you pan size using Julia’s master formula.
Step 13
Pour egg mixture into the tart pan and sprinkle with Parmesan cheese.
Step 14
Bake quiche for 35 minutes until the top is just about set. Arrange 6-8 asparagus spears on top of quiche and continue to bake for another 25-30 minutes, until the custard is set (if edges begin to brown too quickly, cover with foil). Cool to room temperature, cover and chill for 24 hours.
Step 15
To serve, heat in a 350 °F oven for 30 minutes or heat slices in a microwave for a minute or so depending on your microwave.