Daily Bread
Total Steps
11
Ingredients
8
Tools Needed
7
Ingredients
- 1 teaspoon active dry yeast
- 1 teaspoon granulated sugar
- 1 cup warm water
- 2 1/4-2 3/4 cups King Arthur Unbleached All-Purpose Flour
- 1 teaspoon kosher salt
- olive oil(optional)
- black pepper(optional)
- rosemary(optional)
Instructions
Step 1
You <a href="/technique/TPWNYF5L/can">can</a> make this <a href="/technique/482ZKJDV/bread">bread</a> dough in a number of different ways. The simplest, by far, is in a food processor using the plastic dough blade. Pour the <a href="/technique/FVYNJCCW/warm">warm</a> water into the processor and sprinkle the <a href="/technique/HF7TLMS7/yeast">yeast</a> and sugar on <a href="/technique/R34ZSY3M/top">top.</a> Put the lid on the processor and pulse for a split second, just to wet the <a href="/technique/HF7TLMS7/yeast">yeast.</a> Add 1 cup of the flour, process for 10 seconds, and let rest for 10 minutes. This gets the <a href="/technique/HF7TLMS7/yeast">yeast</a> going, lets the flour start to absorb the liquid, and is a good time to do the breakfast <a href="/technique/QQVZX64Y/dish">dishes</a>.
Step 2
Add the remaining flour, between 1 1/4 and 1 3/4 cups, and process for 1 minute. You'll need about 1 1/4 cups in the winter, 1 1/3 cups in the summer, and 1 1/2 cups in the spring or fall; because flour absorbs moisture from the air, and the air is moister in summer than winter, the amount of flour you'll need in your <a href="/technique/482ZKJDV/bread">bread</a> recipes will be less in winter, more in summer. You're trying to attain a very slack dough, one which will barely form a rough ball in the food processor.
Step 3
Remove the dough from the food processor bowl, place it in a large, lightly greased bowl, and cover with lightly greased plastic <a href="/technique/X75YQJ6B/wrap">wrap.</a> Set aside and go on about your work.
Step 4
You <a href="/technique/TPWNYF5L/can">can</a> also make this dough in a mixer, such as a Kitchen Aid, or even a smaller stand mixer, using either a dough hook or dough "beaters." Follow the same procedure outlined above.
Step 5
Guess what? You <a href="/technique/TPWNYF5L/can">can</a> even do this in your <a href="/technique/482ZKJDV/bread">bread</a> machine. Simply put all the ingredients in at once, let the machine go through its first <a href="/technique/FZZDJ42W/knead">knead</a> (25 minutes or so), then take the dough out of the machine and put it into a lightly greased bowl. Reset (turn off) the machine.
Step 6
Finally you <a href="/technique/TPWNYF5L/can">can</a> do this with - gulp! - your hands. Combine the ingredients with a <a href="/technique/NX588QBK/spoon">spoon</a>, then <a href="/technique/FZZDJ42W/knead">knead</a> it with my hands in the bowl for 1 minute.
Step 7
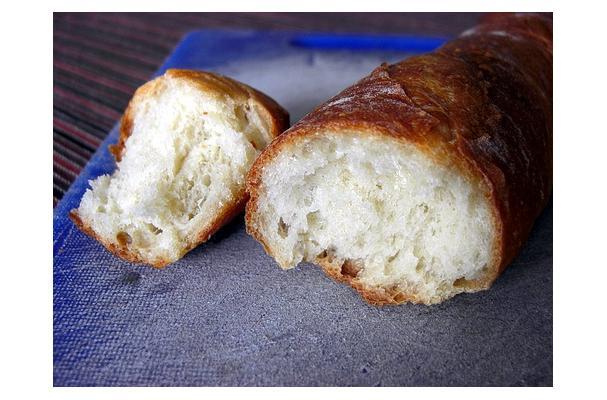
Ten or 12 hours later, or when you get back to it, take the dough out of the bowl and make it into whatever you want. You'll have enough dough to make eight <a href="/technique/LTNN8R88/roll">rolls</a>, eight chewy, substantial breadsticks, one Italian-style loaf or baguette, one round loaf, or a 12-inch focaccia. I usually opt for the focaccia, drizzling it with olive oil, then sprinkling it with a healthy amount of black pepper, a bit of <a href="/technique/DPSVTKVY/salt">salt</a>, and some rosemary.
Step 8
Let the dough rise again, for an hour or so, until whatever you've shaped is good and puffy. <a href="/technique/H3S4YV46/preheat">Preheat</a> the oven to 450F about half an hour before you want to <a href="/technique/RNT367Z2/bake">bake</a> the <a href="/technique/482ZKJDV/bread">bread</a>.
Step 9
<a href="/technique/RNT367Z2/bake">Bake</a> the <a href="/technique/482ZKJDV/bread">bread</a> for 15 to 20 minutes, misting the inside of the oven with cold water from a <a href="/technique/WZLWW3YP/clean">clean</a> plant mister three or four times during the first 5 to 8 minutes of <a href="/technique/RNT367Z2/baking">baking</a>, if you're after a very <a href="/technique/8J3RJ3MF/crisp">crisp</a> crust. Remove the <a href="/technique/482ZKJDV/bread">bread</a> from the oven when it's golden <a href="/technique/D434P8MH/brown">brown</a>, and <a href="/technique/GZFHJC5K/cool">cool</a> it on a wire rack or bring it to the table and eat it immediately
Step 10
As you <a href="/technique/TPWNYF5L/can">can</a> see, this <a href="/technique/482ZKJDV/bread">bread</a> is basically non-fat, and very low-calorie if you don't gild it with butter, garlic oil, etc. However, this <a href="/technique/482ZKJDV/bread">bread</a> cries to be dunked in a <a href="/technique/H7TNTGFZ/seasoned">seasoned</a> olive oil. Think of it this way: it's perfectly healthful and nutritious to begin with, and you do need a bit of fat in your <a href="/technique/Y2KWPXSQ/diet">diet</a>, and olive oil, being preponderantly monounsaturated, is arguably the best kind of fat you <a href="/technique/TPWNYF5L/can">can</a> eat. Go for it!
Step 11
NOTES : <a href="/technique/482ZKJDV/bread">Bread</a> in half the time? Not for us! A good, long rise develops bread's <a href="/technique/PMQVQDJ8/flavor">flavor</a> and texture like nothing else <a href="/technique/TPWNYF5L/can">can.</a> This <a href="/technique/482ZKJDV/bread">bread</a> <a href="/technique/TPWNYF5L/can">can</a> be made every day, because it's so exceedingly simple.