


Summon your inner chocolatier and get ready to make perfect chocolate truffles that will wow your friends! In this most informative video tutorial, baker extraordinaire Cristina Valencia from Jordan Winery shows just how easy it is to make these elegant and delicious chocolate treats. With just a few tools and ingredients, Cristina will share her tips and techniques for making three different kinds of truffles (both soft and firm in dark, white and milk chocolates) using one simple recipe. Watch the video below on how to make the perfect chocolate truffle and get her 6 basic ganache truffle recipes here.
Get recipes, cooking tips and more from Jordan Winery Blog and here:
 |
 |
 |
 |

Chocolate Truffle Recipe Tutorial Demonstration – How to Make Soft Ganache and Firm Ganache Truffles (video transcription)
Welcome back to the Jordan Kitchen. I want to show you today something that we do in-house, we try and make as much as possible in-house and one of those things is chocolate truffles. And we use those for our guest accommodation. So today I want to show you how to make a variety of different truffles using the same basic ingredients. We start with cream and I’m using dark chocolate today. We use the TCHO brand of chocolate from San Francisco. I like it because it’s local, it’s organic. It’s a really nice dark chocolate. As far as tools, what you need is a small pot to boil your cream and a bowl to mix your filling in, another pot, a double boiler set up with a bowl for melting your chocolate. You’ll also need to use an offset flat spatula, a piping bag and your chocolate mold. So you also need some soft room temperature butter and then whatever garnishes that you may want to use on your finished product. So the basic difference between your chocolate shell or exterior of the truffle is that that is just dark chocolate that I’m using. The center, that has cream added to it, whether it’s cream or an egg or a butter filling, it’s something that’s going to soften your chocolate and make it so it’s pipeable.
I’m going to show you basic soft ganache, that’s what you use into a candy mold. That’s one part cream to one part chocolate. So just for simplicity, that’s four ounces of cream, four ounces of chocolate. And you start by heating your cream. All you’re looking for is to bring it to a boil. You pour it over your chocolate. And what I like to do is just cover it for a minute or two to keep the heat in there. And that’s really going to ensure that it melts properly and all the way. If you’re doing a firmer ganache where you have a lot more chocolate than you do to cream, it’s going to be harder to melt that chocolate, so if it’s not completely melted you can turn it to a double boiler on top of a simmering pot of water and then just gently stir it until it’s all the way melted. And you’ll uncover it. You just want to mix it all together. I’ll use probably something like a spatula because you don’t want to whisk air into it, so you don’t want to use a whisk, but you want to just gently melt it, bring it all together. If it’s not coming together you can use a whisk, just not the whole time, you don’t want to put a whole lot of air. This is about the consistency you’re looking for, for a soft ganache. But it will firm up as it cools. One thing that you can do, a lot of people will add soft butter and that’s going to give you a smoother mouth fill. You’ll only want to add about 10% of butter to your recipe.
So for this recipe about a tablespoon is good enough, and just mix it to incorporate, you don’t want to get a lump, that’s why you use really soft. Also if you want to use a liquor in your filling you would subtract the amount of liquid you use for your base. So if you want like once ounce of liquor, take out one ounce of cream for your recipe so that you still end up with the desired consistency. And you can see the butter thickens it just a little bit. What’s important is to make your filling ahead of time because if it’s still warm when you go to cover it in chocolate it’s going to melt your chocolate or if it’s too cold such as if you had put it in the refrigerator to set up, it’s going to seize your chocolate or shock it once you go to cover it. And then your chocolate will crack. And if you have cracks in your chocolate air is going to get into where your filling is and create mold. So you don’t want either of those. You want to kind of use it when it’s at room temperature. Now that your filling’s ready you want to prepare your chocolate. And you always need to temper your chocolate, that’s just a really simple way of heating and cooling your chocolate so that it’s useable. Start with melting about two thirds of the chocolate you want to use using a really dry bowl – a clean dry bowl. If you get any liquid in here, it’s going to thicken your chocolate so that it’s unusable. You’re going to melt it over a double boiler.
So you want to be careful, keep an eye on it because it can steam up and some of the steam can get into the chocolate and ruin it. So keep an eye on that. The reason for tempering is so that your chocolate sets up properly and also give it a really nice shiny sheen and a nice crack to it. If you don’t temper your chocolate, if you use it just when it’s melted the fat crystals all separate out of it and it will rise to the top. You’ll end up with something like this which is called a balloon chocolate. It is still edible but it just looks terrible. So you want to melt your chocolate over some simmering water, just over between a low and a medium heat. You don’t want it to get too hot. I’m melting … I want to end up with about a pound, so I’m melting about two-thirds, that’s just a general rule of thumb. You may have to add more, you may use less. And the reason we’re tempering is because we’re using a nice, what’s called a couverture chocolate, so it uses actual cocoa butter from the cocoa bean. You can go to the store and get something what’s called baker’s chocolate and that, what they do there is they replace the cocoa fat or the cocoa butter with just like a vegetable oil or some other type of oil. So if you decide to use that it is inferior but you do not need to temper it, you can just melt it and use it right away.
So my chocolate is melted, chocolate melts at about 120 degrees. You want to be sure not to get too much higher than that because it can burn. But it’s too hot right now to use, so we need to cool it. The way you cool it is by adding your remaining fresh chocolate into there, about one-third. And this is going to encourage all the fat crystals to align properly so that you’ll have the tempered chocolate. Also what helps to cool it is to continually stir or agitate it. And that’ll make sure that all your chocolate is of the same internal temperature. And you’re going to want to check it with a thermometer. You want to get it down to about 82 to 84 degrees. And so you keep adding chocolate and you keep stirring until you’re about there, you can check with your thermometer to make sure. So now the chocolate’s where I want it. It takes about five minutes, sometimes a little less, sometimes longer. When you get it down to about 82 to 84 degrees, it is tempered, but ideal working temperature for dark chocolate is closer to 88/89. So you want to just return it to your double boiler for a few seconds to bring it back up and then it will be a little runnier, it’ll be easier to work with. As it cools it thickens. So if you can get a little bit of that thickness out it would be easier for you.
And each brand of chocolate is a little bit different. Some will recommend a slightly higher, a slightly lower temperature to work with. If you’re working with milk chocolate, that’s tempered at about two degrees less than dark. And then white chocolate is about two degrees less than milk chocolate. You want to check the package to make sure what each brand is recommending. So now the chocolate is tempered and the ganache, the filling that we made earlier is ready. I’d put that in a piping bag, that’s going to be a lot easier for you to use. And in order to … what you want to do is fill a candy mold. What we use here are these hard plastic, they’re about $25, you can get them online. But also if you’re not going to be using them very often, there are thin disposable trays that you can buy just for about two or three dollars at a Crest or places like Michael’s or Sur la Table they’ll carry something like this. And you want to make sure that your molds are clean. If they’ve been air dried you want to wipe them out so that there’s no water spots on there that will transfer to your chocolate. And also it’ll help your chocolate end up a little bit shinier. So what you’re going to do … I usually just ladle my chocolate all the way, fill up each mold.
If you have a lot of details in the design of the mold you’re using you might get a lot of air pockets and air bubbles. So to get rid of that you just … you want to tap it and you can see the air bubbles rising to the top. And as you’re doing that you also want to scrape it clean. You can let this sit and sometimes 30 seconds, five minutes, it really depends on the temperature in the room and your chocolate. But you’re going to be kind of looking at it as it’s sitting, you want to see that there’s like a little bit of a shell starting to set up around the outer layer of your chocolate mold. So you just let it sit for a little bit, keep your eyes on it. And once you feel that you have kind of a shell what you’re going to do is actually empty your chocolate back into here and you’ll be left with a shell of chocolate and an empty cavity to fill. And just wipe it clean. And then at that point you want it to set up, you could put it in a cool place to make sure it’s firm before you fill it. So now that it’s set up, it’s going to look a lot like this. You’ll see that you have a border around there, your shell and the empty area is where you’re going to put your filling that you made.

So at this point you start filling your mold. You want to make sure that your filling isn’t sticking out too high because then it’ll be exposed to the air again and they’ll be more likely to mold. So I’m going to leave a good amount of room to top it off with chocolate and cover it nicely. So once these are all full, again you’re going to get your tempered chocolate and fill in the rest of the empty area here and just shake it over to make sure that there’s no air left inside the chocolate mold. And again I’ll probably usually tap it a little bit to make sure there’s no air in there. And then to finish all is you do is just scrape it clean. You’ll have a nice finished truffle. And this just takes about maybe 20 minutes in a cool area to set up, longer is fine too. You don’t want to pull them out too early because then they’ll lose a lot of their shine, some of them will get stuck, you’ll end up with a ruined truffle. As your chocolate cools it’s going to shrink a little and contract and that will make it really easy for it just to fall right out of the mold. So I’ll show you an example, this one has already been set up, this tray, and you’ll see it’s nice and shiny, that’s what you get from the temper. I kind of just loosen it a little by twisting. And then you just slip it right over and they should pop right out. All right. And if you use one of these molds, you don’t have to do anything else to finish it, it’s really … usually they come with a nice design so you have a pretty look, and then a soft center which people usually aren’t expecting.
So what’s nice about this recipe is you can easily adapt it to create a whole different looking truffle. What I showed you was a soft filling and that was four ounces of cream, four ounces of chocolate. But if you want to do a truffle that’s a different style, that’s called a dip, you need a firm filling for that. So rather than four ounces of chocolate I’ll use twelve ounces of chocolate with my four ounces of cream and then I just spread that onto a flat tray and let it set up. You’ll end up with something like this. You can really end up with whatever thickness you want. I don’t like it too thin because I like to cut it a little bit bigger and once it’s set up you can cut it into whatever shape you want. So here’s a few examples. And they are easy to handle, that’s why you need them so firm. And these you’ll dip into the chocolate. I’ll show you a few things you can do with that. And you can just use a basic fork or a special fork, so that, but a regular kitchen fork works just as well. So you want to drop it into your chocolate and cover it completely and then lift it out. And you want to avoid getting what’s called a flip, and that’s the extra puddle of chocolate around the base. So you just let all the excess chocolate drip off, slide it on the edge of your bowl. And now it’s ready to be put on your baking sheet. Before it sets up there’s a few things that you can do.
One of the things is you can just put a little piece of garnish if you want. That’s just a cocoa nib. A lot of people like to use salt. You can put anything really, if you have a nutty filling you might want to put a little sprinkle of some nuts. Another thing you can do is use transfer sheets. And these come in a variety of different colors, it’s usually around $4 you can find them at different craft stores, at places like Sur la Table. And what they are, they’re just random designs, they’re made with cocoa butter so they’re safe for the chocolate, and you want to put the design side down and that will transfer onto your chocolate so then when it cools you just peel it off and you’re left with a nice design. So I’ll just put one right here, you just kind of press it on slightly to your chocolate.

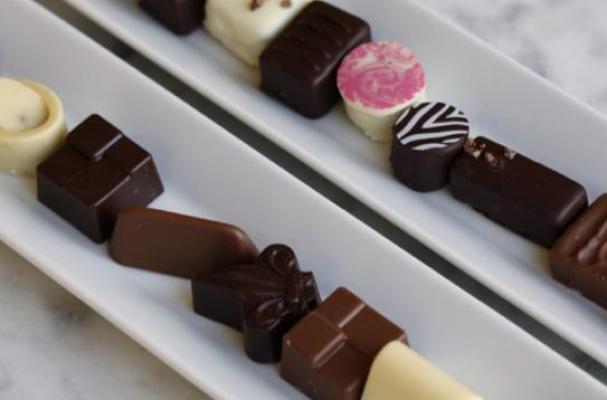
Another design you can do is just creating a simple design using your fork. So once it starts to set up you just put your fork on the top and kind of drag it over. So what’s really nice about this recipe is you can really create so many different looks of truffles and really any filling flavor you want, you can add into the cream. You can use dark, milk or white and end up with such a big variety of truffles, for example here’s just some examples of what you can do if you use the candy mold, all these have a soft center, but different molds and different chocolates make it look like completely different fillings. And if you’re using the firm filling you can do the same thing or you put a little garnish on some of them, you can use transfer sheets, you can cut them into different shapes, use milk, dark or white and it really looks like completely different truffles but it’s all the same recipe.


